Welcome to Guangzhou RONIKI Beauty Supplies Co.,Ltd
Guangzhou RONIKI Beauty Supplies Co.,Ltd
Professional in the line of UV/LED nail gel &
nail accessories factory


Guangzhou RONIKI Beauty Supplies Co.,Ltd
Professional in the line of UV/LED nail gel &
nail accessories factory

255 2023-04-25
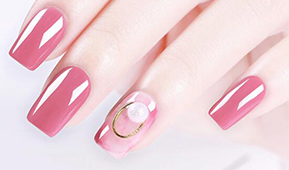
As you all know, nail foil gel has been popular in the nail industry for years, and still sold very well today. Nail foils are a popular trend in the nail art world. They are a fun and easy way to add some sparkle and glamour to your nails. Nail foils come in different colors and patterns, and they can be used to create various designs on your nails. If you are interested in creating your own nails with nail foils, this article is for you.
Nail foils are thin sheets of a metallic or holographic material that can be applied to nails. They come in different colors and patterns, such as stripes, dots, flowers, and geometric shapes. Nail foils can be used on natural nails or with artificial nails, such as acrylic or gel nails.
It is so easy to create your own nails with different nail foils and no other painting tools are needed.
The simple steps would be as follow,
Step 1: Gently shape and file nails
Step 2: Apply base coat and cure it for 60 seconds
Step 3: Apply one thin layer of RONIKI clear foil gel and cure it for 60 seconds.
Step 4: Rub your favorite nail foil stickers evenly to make the full or partial transfer.
Step 5: Peel the sticker off
Step 6: Apply top coat and cure for 60-90 seconds
It is starter-friendly and a good choice for personal use and professional use.
RONIKI foil gel is transparent, so it will be a perfect match for any type of foil.
Nail foils are versatile and can be used to create various designs on your nails. Here are some ideas to get you started:
ㆍOmbre nails – Apply a base color to your nails and let it dry. Apply a foil adhesive to the tips of your nails and press a foil sheet onto the adhesive. Gently lift the foil sheet off the nail and repeat the process with different foil colors, gradually blending them from the tips to the base of the nails.
ㆍMarble nails – Apply a base color to your nails and let it dry. Apply a nail foil adhesive to your nails and press a foil sheet onto the adhesive. Gently lift the foil sheet off the nail and repeat the process with different foil colors, creating a marbled effect.
ㆍPolka dot nails – Apply a base color to your nails and let it dry. Apply a nail foil adhesive to your nails and press a foil sheet with polka dot patterns onto the adhesive. Gently lift the foil sheet off the nail and repeat the process with different foil colors and patterns.
ㆍFloral nails – Apply a base color to your nails and let it dry. Apply a nail foil adhesive to your nails and press a foil sheet with floral patterns onto the adhesive. Gently lift the foil sheet off the nail and repeat the process with different foil colors and patterns.
Here are some tips to help you use nail foils effectively:
ㆍUse a high-quality foil adhesive to ensure that the foil sticks well to your nails.
ㆍCut the foil sheets into smaller pieces to make them easier to handle and apply.
ㆍUse a soft-bristled brush or a cotton swab to smooth out any wrinkles or bubbles in the foil.
ㆍExperiment with different foil colors and patterns to create unique designs.
ㆍApply a top coat to your nails to protect the design and make it last longer.
If you're committed to keeping your real nails, the choice is between regular and gel nail polish...
Nail polish enthusiasts often find themselves exploring various products to create unique and per...
 86-02086388467
 rnkgel@gzluoliqi.com